Thursday, November 28, 2013

Pumpkin Pie


Pumpkin pie – it’s just not Thanksgiving without it, but once you realize how easy it is to make, you might want it more often. Like for breakfast!

I have to admit to using an old standby, the recipe from a can of Libby’s 100% Pure (canned) Pumpkin (see below) which never fails, though I swap out the evap milk for the same quantity ½ and ½. It’s fast, easy, yummy and familiar. However, one year I decided to do a taste test with one “traditional” pie versus one Bourbon Pumpkin Pie which I saw in Gourmet Magazine. Which one won? The Gourmet version did, and you can say because it has fewer eggs and ads sour cream for a little tang, or is more heavily spiced, or is creamier… or you can just say BOURBON.


First of all, you need to make a crust. Click here for my FAMOUS three minute Cuisinart “no roll” crust and thank me forever. If you’re in a rush, fine. Go ahead and use frozen dough. I will avert my eyes. (Below: my pie crust, right out of the Cuisinart. No rolling! Trust me.)


After you blind bake your crust, let it cool while you prepare the filling, as follows:

BOURBON PUMPKIN PIE
1 (15 oz) can pure pumpkin
1 cup heavy cream
1/3 cup sour cream
2 large eggs
¾ cup sugar
3 ½ Tbsp. bourbon
1 tsp. ground cinnamon
¾ tsp. ground ginger
¼ tsp. ground allspice
¼ tsp. salt

·         Whisk together ingredients and pour into cooled shell.
·         Bake until edge of filling is set but center trembles slightly, about 45 minutes (filling will continue to set as it cools). Cool completely.

·         Serve at room temperature. For added depth of flavor, add bourbon to the whipped cream you dollop on top of each slice!
going into the oven - and out of it! (Note in photo below the filling is puffed up. It will settle.)


Sunday, October 27, 2013

NEW COOKBOOKS!!!!!!!!!!

What is the best thing in the world for a collector? Adding to their collection! Sadly, my good friend Leslie's grandmother passed recently, but it was an honor to be invited to the estate sale preview to buy some of her amazing collection of cookbooks. I really do believe that cooking recipes once loved by a dear one is a way to keep their memory alive.

In this case, a new haul of books is also exactly what I needed to break out of a cooking rut. Lately I've been wiped out after work, so I make the same few things over and over again - but now there is NO EXCUSE for me not to once again pick out wild and wacky concoctions from years past and blog about them for your amusement.


Get hungry, folks, cause I'm gonna get reading, and then I'm gonna GET COOKIN! - stay tuned...

Saturday, October 5, 2013

Mushroom Quiche

Real Men, I was told in 1982, don't eat quiche - but for a girl's pool-side brunch, quiche is just the thing!


Just LOOK at all these mushrooms!!! YUMMMM!!!!!!!!


I love this recipe from “The Eggs & Cheese I Love” by Jules J. Bond, 1978, probably because it contains my favorite product in the world, Worcesershire sauce. This recipe also calls for shallots, but I had some nice scallions which I used instead, which just goes to show how adaptable quiche is. You can throw in nearly anything you have, and Ta-Da! Lunch. If mushrooms aren’t in season, might I suggest…lobster?

Mushroom Quiche

1 pie crust **
2 Tbsp. butter
1 Tbsp. minced shallots
1 lb. firm button mushrooms, sliced thin
1 tsp. lemon juice
Salt and pepper to taste
½ tsp. grates nutmeg
1 tsp. Worcestershire sauce
½ cup light cream
4 eggs
½ cup grated cheddar cheese

Heat butter in a skillet, add shallots, saute for about 3 minutes until they are translucent and soft. Do not brown. Add mushrooms and lemon jice, saute for 3 or 4 minutes over moderate heat until mushrooms are soft and most of the liquid has evaporated. Remove from fire, season with salt, pepper, nutmeg and Worcestershire sauce.
Beat eggs, cream and cheese in a bowl until well blended and smooth, then blend with the mushrooms.
Pour into crust and bake in a pre-heated 350 degree oven for about 30 minutes until the quiche is well set.

Serves 6


** Oh, Pour into crust, you say - so I need to make a crust? 

Yes you need to make your own crust. No I do not approve of using pre-made crust. Just NO. If you have a food processor, you have no excuse – that’s what my mother told me, after she taught me her 2 minute pie crust recipe, and she wasn’t kidding. Below is a similar recipe from The Grand Master, James Beard, who embraced the Cuisinart whole heartedly. Mother's variation on this is even quicker - no egg, and she doesn't even roll the crust, and it is splendid. I used it here with a strawberry pie (mmmm!!!) 


Easy crust, yummy quiche - a total hit at brunch! 


Sunday, May 12, 2013

Banana Soup

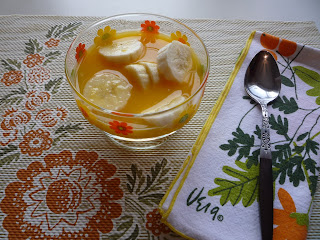
Every Mother's Day I like to make something that my mom used to make for me, and today I offer the simplest treat which, you will find, is also one of the best. The combination of OJ and banana elevates the flavors of both and will light up your morning! I love you, Mom.


Banana Soup:

1 Banana, sliced
1 cup fresh-squeezed Orange Juice

* Pour OJ over sliced bananas in a bowl, and eat with a spoon

Like cereal, but BETTER.

Wednesday, May 8, 2013

Carrot Cake


What do you do with an over-abundance of carrots because your juicer quit working? Why, you make carrot cake! (Or in this case, delicious little carrot cupcakes.) Because come on, who wants to juice when you can eat cake instead?


(Did I mention I had a lot of carrots?)

I googled a recipe for a low-cal version of carrot cake, and also found a low-sugar version in one of my hippie cook-books, the 1976 “Bake Bread” by Marguerite Bencivenga. Between the two, I came up with something not too sinful that still tastes like cake rather than like a hockey puck – success! I should point out that I made a straight up, regular, full fat and sugar, cream cheese frosting. Because I might substitute part whole wheat flour and use less oil, but I will NOT MESS WITH FROSTING.


I’m not giving a traditional recipe here, because you can find those easily (and for about 500 calories a piece!) but do try this version. I made cupcakes, which require less baking time – and pay attention so they don’t become dry! As soon as you can smell them, they are close to done. Since there is much less oil than a traditional recipe calls for (1 cup or more less!) you need more carrots (on average one more cup) to increase the moisture, but it will never be quite as moist. That’s why you NEED the good frosting! However, if you omit the frosting (WHAT!?!?!?) then it is “carrot bread” and you can pretend you’re eating health food. Sure…..

Carrot Cake

4 eggs
3/4 cup vegetable oil
1-1/2 cups sugar
1 cup all purpose white flour
1 cup all purpose whole wheat flour
2 tsp vanilla extract
2 tsp baking powder
2 tsp baking soda
½ tsp salt
2 tsp ground cinnamon
1 tsp ground nutmeg
3 cups grated carrots
1 cup chopped pecans or walnuts

·         * Preheat oven to 350 degrees. Grease and flour a 9 x 13 inch pan (or place cupcake papers into cupcake tins – approx. 18)
·        *  In a bowl, beat together eggs, oil, sugar and vanilla. Mix in flour, baking soda, baking powder, salt, cinnamon and nutmeg. Stir in carrots; fold in pecans. Pour into prepared pan.
·        * Bake in the preheated oven for 40 to 50 minutes (30 min for cupcakes), or until you smell the cake and a toothpick inserted into the center of the cake comes out clean. Let cool in pan for 10 minutes, then turn out onto a wire rack and cool completely.
·        *  Frost when cooled. (see below)

Cream Cheese Frosting:

1 box powdered sugar
3 oz cream cheese
2 Tbsp milk
½ lemon

·        *  Cream the cheese and ½ box of powdered sugar, and add milk and juice of lemon
·        * Add sugar till taste and consistency are right; beat till smooth. You may not need the whole box of sugar. (Oh come on, who am I kidding? Of course you will!)
·         * Frost cooled carrot cake or cupcakes.  


Carrot Cupcakes with Cream Cheese Frosting, topped with Pecans. YUM!!!

Saturday, March 23, 2013

Green Goddess Dressing


Open any mid-century book on California Cooking and I guarantee you’ll find a recipe for one thing: Green Goddess dressing. (See three examples of my CA Cook Book collection, pictured above - all have it.) Since on St. Patrick’s day my friends and I had a “Green Food Till You Puke Pot Luck”, I decided one dish that I had to bring was Green Goddess Salad. It’s green, its slightly bizarre, and everyone loves it. (I also made green fondue, which is another story entirely, and rather disgusting.) See me and my friends in our green finery – Green Goddesses, all of us: 


One of my favorite books on California Cooking is a 1950 edition of the “The New California Cook Book” by Genevieve Callahan. (pictured at top) Not only is it filled with tons of actually tasty things, but Genevieve is knowledgeable and chatty and tells us background on her recipes. She notes, for example, that Green Goddess Dressing was famously served at San Francisco’s Palace Hotel in honor of the English actor George Arliss, who appeared in a play called The Green Goddess in the 20s. (And to think, I had always just assumed it was some hippy BS!) The other thing I adore about this book is that the previous owner, Mrs. Vera A. McMillan, had written ALL OVER IT, and stuck clippings and other recipes in its pages. She clearly was a “Health Nut” who had saved coupons for “Dr. Fearn’s Soya Bean Capsules” and other delights. I am sure she knew my grandmother.


This dressing is simple and everyone loves it, but one thing that always bugs me is that I have never seen “tarragon vinegar” for sale anywhere. Was this something that went away over time? A culinary mystery. Instead, I used white wine vinegar and some dried tarragon. Also, you can adjust the amount of mayonnaise and sour cream to taste in case you prefer one to the other, and “heavy cream, soured” is just sour cream. Some variations on this recipe call for onion juice (1 tsp) or onion and/or garlic powder (very 50s). Finally, to make a dip for veggies rather than a salad dressing, eliminate the mayonnaise entirely, and you can also eliminate the anchovies (which are said to be a later addition anyhow) and it is still excellent.


Green Goddess Dressing

1 clove garlic, grated
3 Tbsp finely chopped anchovies, or anchovy paste
3 Tbsp finely chopped chives or green onions
1 Tbsp lemon juice
3 Tbsp tarragon wine vinegar
½ cup heavy cream, soured
1 cup mayonnaise
1/3 cup finely chopped parsley
Salt and coarse black pepper

Combine ingredients in order given. Chill, then pour liberally over coarsely torn mixed greens – roamine, chicory, and escarole or head lettuce and leaf lettuce. Toss until well-coated, adding more salt and pepper as needed. Serve in individual plates or bowls, to accompany the main course. You’ll mop up your salad plate with French bread when you finish! Makes about a pint.


Oh, did I mention I put just a drop of green food coloring in the dressing? You can barely tell... see, I saved most of it for the frosting on the green cupcakes above. Note also that the green fondue is cropped out of this photo. You're welcome!


Friday, January 25, 2013

Allspice (Pimento) Dram


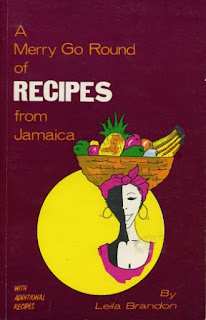
I recently made some friends from Jamaica, and in addition to loving their music, I learned that we also share a love of healthy food including fish, fresh fruit and lots of spice.  They sang beautiful music to me, and I was happy to be able to give them things they appreciated in return: local San Francisco honey and Meyer lemons grown in Berkeley by my mother. Since then I’ve been looking at this adorable booklet of Jamaican recipes from 1963 (Leila Brandon’s Merry Go Round of Recipes from Jamaica) and wanting to make something, but much of the ingredients are extremely unfamiliar. A recipe for Pimento Dram caught my eye, which I know as an ingredient in many classic Tiki Drinks, and which I also know to be an expensive liqueur to purchase. Even the tiny vintage airplane bottle that I have once cost $8.70 (according to the
price tag still on it from the shop called “All Things Jamaican”) so I figured this project could save me some money. 
 
Rather than buying St. Elizabeth Allspice Dram for $25, which is indeed excellent but pricy (and in a tall bottle that annoyingly won’t fit in my cabinet) I decided to make my own. The procedure seemed simple enough, though Ms. Brandon’s recipe called for fresh allspice berries (which I couldn’t find) and lots of fresh lime juice (which might not be stable at room temp over time) so I went to the trusty Interweb to look for a different recipe, and was happily able to find a similar one, which I provide for you here. If you love the flavor of pumpkin pie spice (which comes mainly from allspice berries, also known as pimento), you’ll adore this liqueur. It takes a couple of weeks to make, but is well worth it.
 
In addition to traditional Tiki drinks, allspice dram is called for in many cocktails such as the delicious 1937 Lion’s Tail (see below) and also tastes yummy over vanilla ice cream or as a flavoring for a delicious flan. Brew some up today and thank me in a fortnight. 
 
Allspice Dram: 
 
1 cup light rum
¼ cup whole allspice berries
1 cinnamon stick
1 ½ cups water
2/3 cup brown sugar
 
1. Crush the allspice berries in a mortar and pestle or grind them in a spice grinder. You want coarse, large pieces and not a fine grind.
 
2. Place the crushed allspice in a sealable glass jar and pour the rum on top. Seal the jar and shake well. Let this mixture steep for 4 days, shaking daily. On day 5, break up the cinnamon stick and add it to the mixture. 
 
3. After 12 days total steeping, strain out the solids through a fine mesh strainer. Then strain again through a coffee filter into your final bottle or jar.
 
4. Heat water and sugar on medium until boiling, stirring to dissolve, about 5 minutes. Let the syrup cool, then add it to the strained allspice infusion. Shake and then let rest for a minimum of two days before using. (Yield: about 3 cups)
 
 
Lion’s Tail (1937)
 
2oz Bourbon
½ oz Allspice Dram
½ oz Line Juice
1 tsp. Simple Syrup
1 dash Angostura Bitters
 
Shake over ice, strain; serve straight up in chilled cocktail glass.