Showing posts with label Dessert. Show all posts

Tuesday, January 25, 2022

Family Tradition: Angel Food Cake


Angel food cake IS birthday cake!

Waiting for frosting


Who doesn’t like cake? As a kid, it was my favorite food, a treat reserved for birthdays, and it was always the same: Angel Food cake with pink frosting, served on a raised glass cake stand. I was told it was a family tradition, and was delighted to find photographic evidence from back in the 50s when my mom was a kid: the same cake!

Mom and Angel Food Cake, 1950s

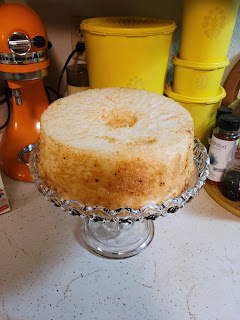
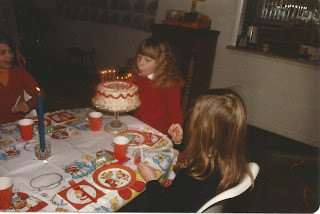
Now I’m not sure when or with whom our family tradition originated, but I do know that for every one of my years, there is a photo of me, grinning ear to ear, in front of the Angel Food cake on the glass stand. Decades later, I made the same cake for my daughter and am still using the same stand. So when the time came to bake a cake for my Auntie’s 80th you can guess what I made: Angel Food cake with pink frosting. It’s a family tradition.

Auntie with Angel Food Cake 2022

Me with snake while Mom frosts the cake, 1970s

My 10th Birthday, 1980s

My 21st Birthday - white frosting that I decorated and a different cake plate, 1990s

Thank you Karen for this pic from my 39th birthday!


Mother herself with TWO Angel Food Cakes, 2014. Looks like we were doing berries and cream rather than frosting that year


The recipe itself became popular in this country in the 30s but actually dates to about 100 years before that. It’s pretty timeless and delicious and everyone likes it. And while baking it from scratch isn’t that difficult, I have to admit to using a mix. So did my mom, who otherwise made everything from scratch and was a gourmet cook and instructor. But she was also a working single mom and when throwing a party all by herself, she picked her battles. So I do the same, though I will include a recipe from the kind of cookbook that all American housewives would have had in the 40s. If you are not simultaneously trying to kid-proof your home and decorate for the imminent arrival of multiple pint-sized holy terrors, go ahead and make it yourself! Otherwise, just use the mix, nobody's gonna complain. 

Standard American Cookbook from the 40s

Not too complicated, but what they don't mention is how long it takes to beat the eggs!

Ingredients, including Mom's now vintage candles & holders

So easy; just add water to the mix

Beat with a mixer for 90 seconds

Batter will be thick

And it's done

Invert to cool

Cut around the sides


Part of the charm is the frosting: my mom always made a cream-cheese based frosting and used red food coloring to turn it pink. (Except the one year she made it blue and my 6 year old daughter cried because it wasn’t pink, but that’s another story.) The frosting is so good that if there was any leftover, she would put it in Tupperware and let me spread it on graham crackers as an after-school snack.

Mom's cream cheese frosting. Yum.

Frosting is sugar, citrus, coloring, cream cheese and milk (not shown)

Adding food coloring is psychedelic

Think Pink!

Frosting the cake

The cake is ready for candles! These are the same holders my Mother used.

Here's to family traditions! May you and yours have many occasions to celebrate that call for a special, and simple, cake. 


NOTE: if you need any of the kitchen tools shown, find them in my Idea List on Amazon: https://a.co/0uId9bG


Tuesday, May 31, 2016

Real 1950s Cherry Pie


For Memorial Day, I felt like doing something TOTALLY American and 50s: baking a cherry pie! In addition to being politically active, that is the kind of thing that makes me feel patriotic. Well, I also happened to have a huge bag of cherries, so….

Keepin it real since 1955...


Cherry pie. It screams summer, but of course you can use canned or frozen cherries and make it any time of year – and to be SO mid-century, frozen would make sense. In the 50s, consumers were told that canned foods were clean, healthy and engineered to be more nutritious than dirty old things you grew yourself. After the war, when people had to grow food in “victory gardens” to eat, you can see why processed foods were "modern" and appealing… but I digress. I used fresh cherries this time but I DID use shortening in my pastry because that’s good and retro. Yuck! But… yum.


This is all you need! No excuses. 


So pie is basically a crust (or two) and a filling, a very simple and stunningly delicious treat that isn’t hard to master and is most certainly worth the effort. For this pie, I chose a recipe from my 1955 Duncan Hines “Dessert Book” which came from the Stagecoach Inn in Manitou Springs, CO (You guys, this place has been around since 1881! Don’t you love it when a recipe has a pedigree like that? I wonder if they still make this pie… HELLO, ROAD TRIP!!!). What I love most about this recipe, and many pie recipes you will find in old cook-books, is that there are limited directions. Implying, dear reader, that you ought already to know how to make pie, so you are presented with the ingredients for this specific one, and a brief sketch of technique. You say you can’t bake a pie? What are you, un-American?

rolling the bottom crust

my helper making the lattice top


Another reason I chose this recipe is that the filling isn’t thickened with tapioca or otherwise (not that there is anything wrong with that, but when you have fresh fruit, you can go very simple and let the fruit be the star). This filling is flavored with sugar (I cut it to just under  1 cup) and a drop of almond extract, which is a fabulous note to add to cherries. I did make a lattice top, simply because I wanted to teach my daughter how to do that (so she doesn’t need to watch a Youtube video, for god’s sake!) but we didn’t get fancy with lemon zest or an egg wash or fancy bird-shaped pie vents. But we should have used a deep dish pan to prevent over-flow... next time. Must go make another right away, this a matter of National Importance. 

Yum!


Thursday, January 7, 2016

Original Swiss Chocolate Fondue


Things are about to get fancy...

Though I have hundreds of fondue cookbooks, I have always loved this one for its extra groovy cover art, and the name: “The Fabulous Fondue Cookbook”!  Straight out of 1970, yo. The recipes here are by William I. Kaufman, and the very stimulating intro to each section (“But then we got to dessert. I dipped a fresh strawberry into the softly simmering chocolate fondue, and offered it to him. That did it! He proposed. Chocolate fondue is so sexy.” AND I QUOTE) were penned by Ms. Carmel B. Reingold. Nice work, you swinging cats!

Groovy, baby!

If you seek a proposal (or, in my case, just a tasty dessert), here is a fondue you can whip up in a flash that will melt anyone’s heart. (Melt, get it? Haw) The fact that Toblerone is a complex chocolate bar makes it seem like you spent way more time on it than you did, and fortunately chocolate fondue isn’t terribly messy. It also makes ANYTHING taste like heaven. Heck, it’s fabulous.
cheers to fondue!


Just a couple notes: Once you’ve made the fondue in the double boiler, you pour it into a ceramic bowl which is kept warm (and melted) over candle flame. This, however, is hard to regulate, so you may find it bubbling, in which case BLOW OUT THE CANDLE or your fondue will scorch. Then light it again in a few minutes. Yes, you have to work for it, but you’ll be glad you did. Also, dipping bananas into the chocolate tastes GREAT, but is really hard. You may lose one (or more) but the ones you get will be deeeeeelish. Other things to dip are: cubes of pound cake, mandarin orange segments, mini pancakes. And if (yeah right) you end up with fondue left over, serve it as sauce for waffles! Enjoy.


Original Swiss Chocolate Fondue

4 bars (3 oz each) Toblerone chocolate
1 1/3 cups heavy cream (to taste – pour in by the tablespoon)
2 Tbsp kirsch (I use Cointreau)
Whole fresh strawberries
Apple slices
·         Break chocolate into pieces. Over hot water, combine chocolate, cream and kirsch.
·         Stir until mixture is smooth.
·         Serve with strawberries and apples for dipping

I'm MELTING.......


Thursday, December 17, 2015

Chocolate Pound Cake


Do you ever just REALLY. NEED. CHOCOLATE. CAKE? Come on, I know you do. Well that was me the other night, so I pulled out a card from my beloved 1973 “McCall’s Great American Recipe Card Collection” (oh you know, the one with the red white and blue logo with the huge American eagle? Yeah, that one. Hard to miss.) and made cake. Because I needed cake. Immediately.


The problem is, this cake isn’t ready immediately. First off, they don’t tell you till step 3 that the butter needs to be room temperature, which means you have to put the eggs and sour cream back in the fridge and watch an episode of “Murder, She Wrote” while you wait. Then get back to it. Second, for a small cake, it needs to bake for over an hour – people, you’ve just bought yourselves another episode! Hello, Angela Lansbury! But have no fear – the cake is good – but the batter? THE BATTER IS THE BEST PART. Make sure to enjoy some while you wait…


And after the 3 (or 200) hours it takes to prepare it, this is actually a nice cake, with decent chocolate flavor similar to my favorite cookies (DSers, see recipe here)  HOWEVER, since I am a very picky customer, I will point out that for a pound cake, it was a little too light and fluffy. Too light and fluffy you say, how is that even possible? How can you complain about that? Well, I prefer a light and fluffy angel food cake but a dense pound cake, call me nuts. Still, this has a nice flavor and is quick to make will give you something to do while you wait for your online stream to buffer ;)

going in...


just out of the oven


Ingredients:
1 cup boiling water
2 squares unsweetened chocolate, cut up (Note: 2 oz)
2 cups sifted all-purpose flour
1 tsp. baking soda
¼ tsp. salt
½ cup butter (NOTE: room temp)
1 ¾ cups light brown sugar, firmly packed
2 eggs
1 tsp. vanilla extract
½ cup sour cream

Method:
1.       In small bowl, pour boiling water over chocolate; let stand 20 minutes to cool.
2.       Meanwhile, preheat oven to 325 degrees. Grease well and flour 9x5x3” loaf pan. Sift flour with soda and salt.
3.       In large bowl of electric mixer, let butter stand at room temperature until softened. At high speed, beat butter, brown sugar, eggs, and vanilla until light and fluffy.
4.       At low speed, beat in flour mixture (in fourths) alternately with sour cream (in thirds), beginning and ending with flour mixture. Beat in cooled chocolate mixture just until combined. Pour into prepared pan.
5.       Bake 60 to 70 minutes, until cake tester comes out clean.

6.       Cool in pan on wire rack 15 minutes. Transfer from pan to rack; cool completely. Sprinkle with confectioners’ sugar. Makes 1 loaf.

Saturday, January 17, 2015

Coffee Jell-O

It is no secret that I love Jell-O, even the 50s experiments that were once referred to as “salad” that often featured seafood, mayonnaise, onions and other unappetizing ingredients. Jell-O doesn’t have to be disgusting, though! Not only can it be quite refined, the history of gelatin-based foods goes back over one hundred years. 
Here I am, about to enjoy a delightful coffee Jell-O!


This recipe for the perfect after-dinner treat / pick-me-up actually comes from a 1971 book on fondue (the cheerfully titled “Fondue on the Menu” by Beverly Kees and Donnie Flora) but coffee gelatin desserts date back to the turn of the last century. The variety here would have been served after fancy dinners; huge vats of Jell-O made with leftover coffee have been common at church pot-lucks for nearly as long.

Even Fondue cookbooks sneak in Jell-O recipes


This is an easy treat to make, and if you have a fear of the Jell-O mold / un-mold process, make each one in a cocktail glass or small ramekin instead, which gives each guest their own little pot of shimmering caffeinated goodness to enjoy with a demitasse spoon! Word to the wise: the liqueur does not get cooked out, and these will be as strong as the coffee you use.

I'm thrilled to use my new Chemex coffee maker as well as my very own coffee liqueur!


2 Tbsp (2 envelopes) unflavored gelatin
½ cup coffee liqueur
3 cups coffee
¾ cup sugar
Pinch salt
Sweetened whipped cream

In a bowl sprinkle gelatin over liqueur to soften. In a saucepan, warm the coffee and sugar together until the sugar is dissolved. Add the gelatin mixture and salt; stir and heat until all the gelatin is dissolved and the mixture is perfectly clear. Pour liquid into individual molds and chill several hours. Unmold; garnish with whipped cream. 

Sunday, October 5, 2014

Banana Whip


Inspired by the Art Deco Society of California’s annual amazing time-travel picnic the Gatsby Summer Afternoon, I decided to research 20s recipes because I usually make things that are much newer - in the realm of my own experience or just before it, for the most part. But how different could it be? I sought out my 1927 “Piggly Wiggly Cookbook” (from the popular grocery chain of the same name, which dates back to 1916), to find out.


WELL! Things were different. First of all, the “name brand” ingredients are totally baffling to me, and they are often listed out by name only, with no further explanation. I had to research most of them to see if I could even concoct the majority of the creations. What was Snowdrift? What was Fluffo? (both are shortenings, it turns out.) Next, cuts of meat were not familiar to me either, and all vegetables were presented canned. (All hail the new technology of canned foods, right?) Then many of the titles confused me. What is a Junket? Hmmmm. Basically, nothing appealed till I found a somewhat simple chilled dessert made with bananas and pistachio nuts. Hey, that almost sounds like a new foodie pairing, doesn’t it? I can just see the next artisan doughnut: banana batter with pistachios and bacon bits…

Ingredients - shelf-stable whipping cream is NOT recommended BTW


Anyhow, seems like when you cook anything from the 20s, the first step is to get out the double boiler. CRASH! (Sorry, neighbors!) I suppose if it were a recipe from the 80s, you would microwave it, but just YUCK . So you heat up the bananas and sugar and lemon juice and then it gets flavored, mixed with whipped cream, served in cute little glasses and topped with chopped pistachio nuts.


On a hot afternoon I prepared this for after dinner and it was surprisingly tasty – I would even make it again! I don’t think you need to line the glasses with sliced banana – I did, but it was more than necessary. Try it – you’ll like it so much you might even find yourself breaking into The Charleston….


Banana Whip

3 Bananas
1 cup heavy cream
1/3 cup sugar
Few finely chopped pistachio nuts
Pinch of Leslie’s salt
1 Tbsp. lemon juice
Folger’s vanilla

·         Cooked mashed banana pulp in a double boiler with sugar and lemon juice until scalded. Add a few drops of vanilla and a pinch of salt and cool.

·         Whip cream until firm, and gradually beat in banana mixture. Set mixture aside to chill.


·         Pile high in sherbet glasses with a sprinkling of finely chopped pistachio nuts on top. If you wish, line the glasses with slices of banana before filling. This serves eight people. 


Heat the bananas in a double boiler

Chop the pistachio nuts


Serve!